

Level Up Your Work From Home Network Game Part 2
(Updated Sept 06 2021 – fixed images)
Welcome back. In part 1, I described some tactics to better harden your PCs and the ISP device that doesn’t come secure by default.
In this part I’ll go into greater detail of some additional architecture and technology that can be used to better secure your home networks. The name of the game is making things harder for adversaries to get into your networks and hosts.
If you have a budget, more segmentation among the equipment in your networks can also be done to be more secure.
Below is the bill of materials for my setup. Different things can be done with different equipment and depending how deep you want to go – I’ll advise what I paid more or less from where I live (Canada).
- ISP Equipment or Customer Premises Equipment (CPE from internet service provider);
- Home router and firewall setup ($100);
- I highly recommend spending a bit of money on this part, where I’m at, $100 gets a good device that can support VLANs, VLAN Trunking and some basic firewalling between zones, you might be able to get something with an integrated switch.
- If you ISP authenticates your connection, you’ll want to set this up here as well to create your internet zone or interface;
- Unless you have your own DNS and DHCP servers, the router should handle these;
- I highly recommend going with a router that is supported by the OpenWRT project or other alternate router firmware (DD-WRT etc). It will have more features than the stock manufacturer firmware and be updated more often.
- A separate switch to have your equipment plugged into outside of the CPE; ($100)
- The switch needs to be a managed switch (so you can log on and change settings);
- support VLANs;
- support 802.1q VLAN trunking.
- A nice to have: A separate individual wireless network access point (AP). I use Ubiquiti APs. The management is simple enough with their VM based WiFi controller, it can really get a lot of info around what’s connected and how connected hosts are faring, if you splurge for their firewall, this can also be integrated into a single pane of glass setup for traffic monitoring. The PRO style APs are around $200 each, some less expensive models are also available.
Now that I have the equipment – What do I do?
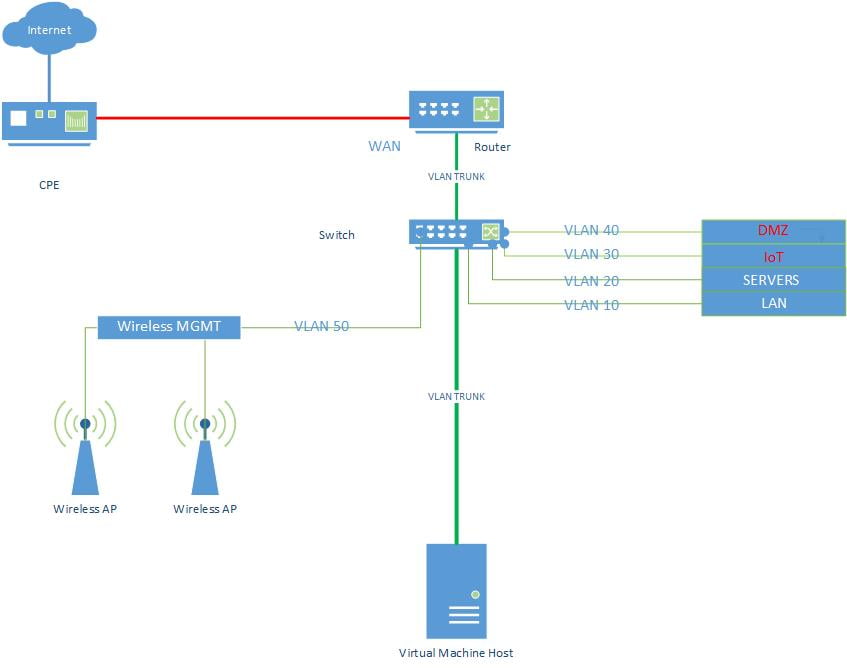
You have gotten this far, congratulations! Here is what my home network architecture looks like, I’ll go through the setup steps below.
Internet Setup
My internet CPE bridges the connection between the cable from outside and my router. I plugged in a cable between this CPE and the up link port on my router and designated it as my internet interface on my router and put it in a firewall zone called WAN. A PPPoE client connects to my ISP from the router. Network Address Translation (NAT) is used to forward and receive internet traffic to and from my hosts inside the network.
Internal Network Setup: Router and Firewall
The router has multiple VLANs configured. Think of a VLAN as a network that you can segment off for a specific use all with different IP addresses and that are brought together in the router. You can then apply rules as to which hosts or VLANs can communicate with others. In my case I have six (6) VLANs. Do not use VLAN ID 1. This is usually setup as the default or native VLAN and you can run into issues later.
- LAN For the PCs that I have direct control over;
- Servers For some internal VMs that I use for labs;
- IoT Home automation and extras that might leak information;
- DMZ For some specific outward facing services;
- Wireless Mgmt This is the network that the APs are on and the server than manages them;
- Guest This is for guests wanting access to the wifi.
Each of these has a IP address gateway and netmask on the router and a firewall zone.
| Firewall Zone Name | VLAN ID | IP Gateway and Netmask | Firewall Rules |
| WAN (internet) | none | Varies based on ISP | NAT enabled to all zones, Some specific services pass through to DMZ zone. |
| LAN | 10 | 10.248.10.1/24 or 255.255.255.0 | Can access all other zones if hosts in LAN zone initiate traffic & can access WAN |
| Servers | 20 | 10.248.20.0/24 | Can only access WAN |
| IoT | 30 | 10.248.30.0/24 | Can only access WAN |
| DMZ | 40 | 10.248.40.0/24 | Can only access WAN & can receive from certain hosts in LAN and Servers |
| Wireless MGMT | 50 | 10.248.50.0/24 | Can only access WAN and can receive from certain LAN hosts |
| Guest | 60 | 10.248.60.0/24 | Can only access WAN |
You can add more or less granular firewall rules for your inter zone communications. You can also restrict the number of IPs in each vlan by reducing the netmask size or if you use DHCP in these VLANs to automatically assign IPs, restrict the number of IPs to the number of hosts you think you’ll need.
Internal Network Setup:Switch
Once the VLANs and their identifiers (IDs) are configured on the router, it’s time to setup an uplink between the router and the switch (if you have). If your router supports VLANs it should also support VLAN trunking over the 802.1q protocol. To use a plumbing analogy: The trunk is like a flow of water in a city water pipe. The water molecules are the network traffic that are tagged with VLAN IDs. All water goes to a central hub (the switch) and the hub reads the IDs on the molecules and based on their ID sends the molecules on their way to the right house so that water comes out of the taps (switchport).
On your switch, you will need to log in to the admin interface. Find where the VLAN IDs can be configured and add in your VLAN IDs (10,20,30, etc..) and in case also add VLAN 1. Set the port coming from the router as a ‘Trunk’ or ‘Tagged’ port. Add the VLAN IDs as the tags for the trunk, that way the port will know to accept these vlans on that specific port.
For the other switch ports that could be connected to PCs, servers, access points, set these as an ‘Access’ or ‘Untagged’ switchport and input the specific VLAN ID of it’s network. Following our example above if I was plugging in a LAN PC, I would put this specific port in VLAN 10.
Internal Network Setup:Wireless Network
This can be tricky, depending on what kind of equipment you have. With my separate wireless network access points (AP), I run a VLAN trunk on the wire from the switch to the individual AP. On the trunk port configuration, I only add the VLANs I want to be available over the wireless. I create separate SSIDs for each VLAN to segment the hosts that will be connecting to it. This configuration bridges my wired and wireless networks, hosts that are wired are in the same IP space as the wireless connected hosts. I also transmit the WiFi MGMT VLAN so that APs can get a dedicated management IP, this VLAN is not transmitted over WiFi.
| VLAN or SSID Name | VLAN ID | Security | Hide SSID |
| Home-LAN | 10 | WPA2-PSK | No |
| Home-IoT | 30 | WPA2-PSK | Yes |
| WIFI MGMT | 50 | Not broadcasting | N/A |
| Home-Guest | 60 | WPA2-PSK | No |
For security, the WPA2 standard is the most secure to date for home wireless networks. It is short for WiFI Protected Access 2. It uses AES encryption to authenticate hosts to the access points. The PSK part of the security column is for Pre-Shared Key, or simply put a password. Use the same rules for these passwords as in Part 1. Longer is better, 20+ character random, unique keys input now can save you tons of grief later if someone cracks your wireless password, starts sniffing your traffic and gaining admin privileges on your devices.
With all the news out there around home automation listening in, I created a VLAN for these. As long as they can reach the internet they’re usually good. The initial setup can be tedious, with a mobile device and the device’s own local Wifi, but it’s worth it to deter adversaries and the companies themselves from having access to your more secure networks.
Some Additional Pointers
I know all of the above is not a walk in the park, it took me some time and effort to figure out the intricacies of these devices. Even today I have not stopped learning. I’ve added some additional steps you can take once your network is up and running.
- If your router can filter MAC addresses, assign a static IP to a host’s MAC Address through the DHCP service. This way only hosts you’ve authorized and configured can connect. Or better yet don’t use DHCP where you can avoid it and use static IPs.
- On your wireless setup, disable WPS functionality, it’s a sieve.
- Make sure you patch the firmware on your devices often. Adversaries are constantly looking for vulnerable devices.
- Use long passwords or passphrases for your keys and authentication. Especially on any management interfaces to your devices.
I hope this has helped some of you out in your journey to have am ore secure home network. I hope I have saved some time, effort and brought some value to your security journey. If you want to get into closer network monitoring I would recommend checking out my previous posts around setting up a network probe device and having it report traffic patterns here.