

How to Start an Asset Inventory
At the top of most lists to better secure your network is to have an up to date inventory of physical and virtual assets connected to your network. Most security controls frameworks have as their most fundamental controls to implement. For corporations with mature procurement processes this is easier, but what about a home user or small or medium business? It’s one thing to have a list but how often is it updated? How can this be automated? Can I get alerts if a new device is detected?
Below I’ll try to help out with some pointers and outline my journey to an asset inventory.
At it’s most basic level you can get away with a Microsoft Excel spreadsheet that outlines the following high level criteria:

The Center for Internet Security has a free template that can be used at the following Link
Naturally, filling our a spreadsheet and keeping it up to date can be daunting. You fill it out once and give yourself a pat on the back for doing it, but…. do you really want to get into the habit of updating it every time something new pops up. Imagine 10s or 100s of new things, not to mention things that get lost. This manual approach does not scale well.
What else can be done?
Glad you asked. There are a multitude of tools, free and not so free that keep trying to do something about this. In my own small network, I’ve used the following.
I’ve had great success with https://rumble.run. There’s a free tier called the Rumble Starter Edition where you can scan up to 1024 IPs but will track 256 live assets at this tier. More than enough for a small network. One of the big pluses is that I don’t need to install a client software on each individual machine. The fingerprinting function on the rumble client is really good and constant updates have brought many more device types into the fold.
Steps to get going:
- Setup an account on rumble.
- Download and install the rumble client on a VM or host that has visibility on your network.
- Check the rumble portal to ensure the client is communicating with the mothership
- Setup a schedule of scans. Identify the IPs you want to scan and enter these on the Tasks menu. I do mine daily, but other options are available.
Once the client has scanned once you should see reports filling in similar to:
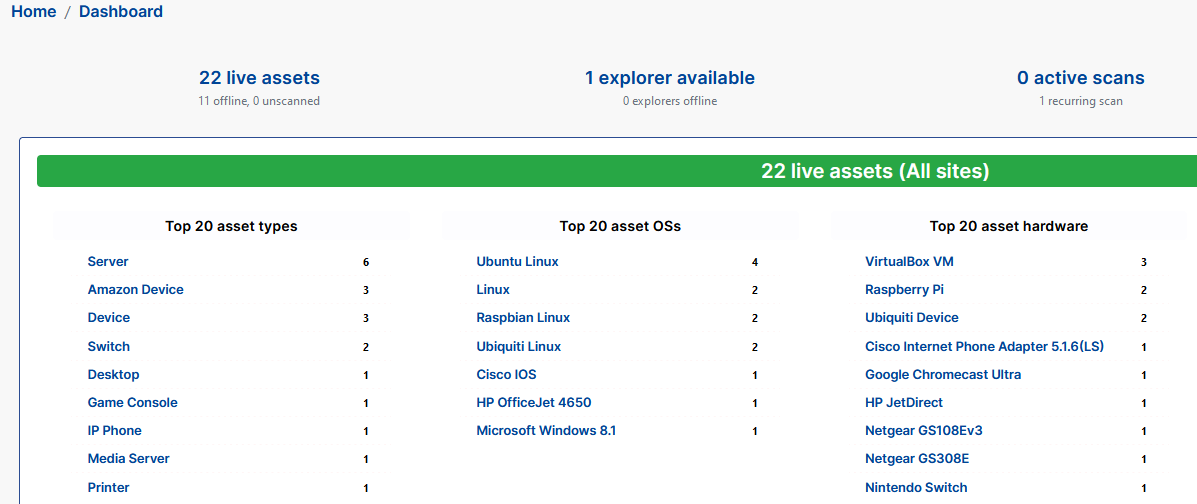
You can then drill down into different asset classes or show all discovered assets through the inventory menu. Many options are available to slice and dice this data into a format you would need to keep track of your hardware assets through the Export button you can extract a report of assets in JSON, XML and CSV formats or through an API call.

I use this mostly to keep an eye on what’s on the network. I run it once a day across the different VLANs on my network. Coupled with a vulnerability scanner this goes a long way to making sure you’re kept aware of what’s responding on your network and if any patching needs to be done.